
Fig 1
Pegasus Mail for Windows On-Line Guide Part 1
PREFACE
Since the original Pegasus for Windows notes were written, a number of new releases have been made. There are now a number of new 'extensions' (see later) that first appeared in version 2.4. These were not available in the 2.0 (r1) release - which is the version covered in the Information Services booklet 'User Guide to Pegasus Mail for Windows', NET 6.1, September 1995, Paul Snell. (This is henceforth, referred to as "the Guide".)
These notes cover the version 2.5x (2.53, 2.54, ...). The older version, 2.0, will not appear on-line. If you wish to use this version, you may obtain paper copies of the Net 6.1 mentioned above from the Photocopying Desk in the Main Library.
Pegasus Mail for Windows 2.5 is available on a number of Novell servers at The University of Birmingham. The particular way in which you access the program might differ from server to server. If you are registered to use one of the Information Service's central Novell servers, known as NOVELL1, NOVELL2..., then Appendix A gives instructions on how to ensure that you can run the Pegasus Mail for Windows program provided on that server from your PC.
Before you can access Pegasus Mail you will probably need to be registered for, and then enter an username and password for, the appropriate Novell server. Instructions for doing this should be available from your Novell Server Administrator or are given in other documentation. If you are using Novell5/ Novell2/..., please consult the document:
'Using the ACS Central Novell NetWare Service from a PC', NOV1.0, December 1993
| Section 12 of the above document, 'Electronic Mail', gives very important information about the location of your Home Mailbox, which needs to be in the correct directory. If you do not have a copy of NOV1, it can be obtained from the Information Office, Information Services, Elms Road, (ext 4754). |
In addition, Section 9.2 of this document gives similar information on the location of your Home Mailbox and how to change it. Please pay particular attention to the information in that section.
The rest of this document assumes that you are using Windows 95, Windows 3.1 or Windows for Workgroups 3.11 and that your Windows environment can display a Pegasus Mail for Windows icon, and that double-clicking on the icon will start a correctly configured version of the Pegasus Mail software.
After starting your PC, ensure that you login correctly to the Novell server that will provide you with access to Pegasus Mail for Windows.
If your PC does not present you with a Windows environment after logging in to the server, then start Windows. In most cases, you do this after you see a DOS prompt by typing:
WIN
| When you have the Windows interface on screen, look for the Pegasus Mail icon (see Fig 1). This might be in the Main window, or in a window of its own. When you have it displayed on screen, double-click on the Pegasus Mail icon. | Fig 1 |
What do you see?
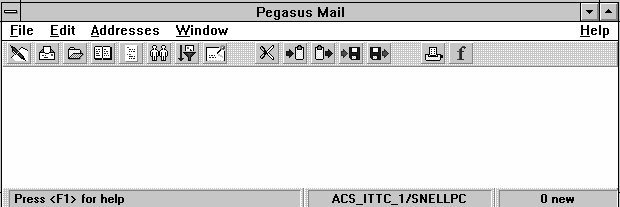 Fig 2 |
The opening screen (see Fig 2.) shows a toolbar and a menu. If you have used a previous version of Pegasus for Windows, you will not be familiar with the toolbar. It can be removed and replaced with the button panel used in earlier versions. The main difficulty with the toolbar as shown, is that there is no information concerning the function of the individual buttons. However, if you point at a button on the toolbar and press the RIGHT mouse button, then in the message bar at the bottom of the Pegasus Window you will see text describing the purpose of the button.
WinPMail's button panel is a set of tools which provides access to the most commonly-used parts of the program at the click of a button. Depending on the setting you specify in your Button Panel Preferences (see Button Panel under Preferences in the File Menu), the button panel can appear as either a fixed toolbar beneath the main menu (the default) or as a small floating window in either horizontal or vertical format.
WinPMail remembers the location and state (open or closed) of the button panel between sessions. You can also choose between having the button panel as a toolbar, or as a floating window in vertical or horizontal format using the option in your Preferences.
When the button panel is active as a toolbar, the buttons have the following functions:
| Compose a new message Read new mail Open/manage mail folders Open/manage address books Open/manage distribution lists Open the local user list New mail filtering rules Use the noticeboard system Cut selection to the clipboard Copy selection to clipboard Paste the contents of the clipboard Save or write to disk Retrieve or import from disk Select font |
To change to a floating Button Panel (as in previous versions):
| You are presented with a dialog box (see Fig 4.) to choose the type of Button Panel you want: | 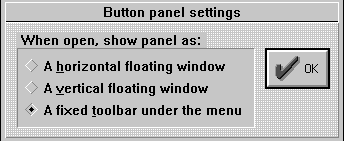 Fig 4 |
When the button panel is active as a floating window, the buttons have the following functions:
 Fig 5 |
Compose a new message Read new mail Open/manage a mail folder Open/manage address book Open/manage distribution lists |
In the rest of this document references to a button will mean a button on the toolbar.
When you start Pegasus Mail for Windows, you may or may not see a window which shows you a list of new mail. This depends on how your Pegasus Mail preferences are set up. More information on setting up preferences is given later in this document.
If you click on the Open or rescan new mail folder button, you will be shown a window that allows you to view all mail that has arrived since you last used Pegasus Mail. Also, you will see any mail that arrived previously, but which you have not yet read. This is dealt with in more detail later in Section 4.
To switch off the New Mail Folder window:
| - if you are using Windows 3.1 then double-click on the menu control button in the top left hand corner of that window (see Fig 6). | |
| - if you are using Windows 95 then click on the Close Window button on the top right hand corner of the New Mail Folder Window (see Fig 7). |
Produced and Written by Paul Snell.